General Settings
The General Settings page is accessible by Administrators and contains settings related to the Keebo platform.
How Is Cost Per Credit Configured?
In the Cost per Credit section of the General Settings page, set how much the organization pays in dollars for Snowflake credits. This value is used across the product to display savings in dollars.
The Projections page uses this value to show projected savings with and without Keebo in dollars.
How Is SSO Configured?
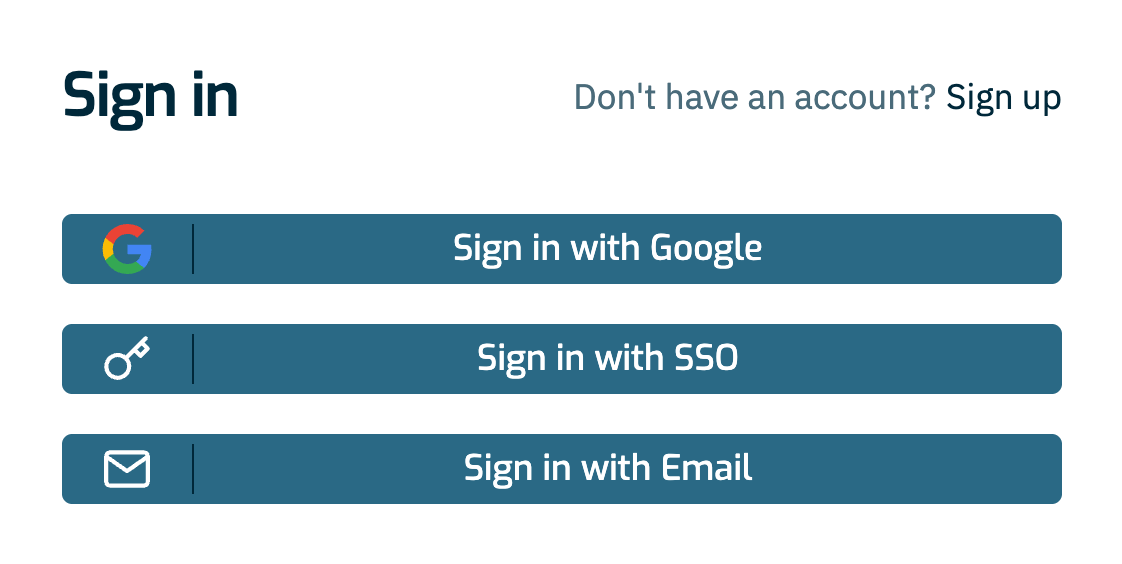
Keebo supports authentication via Google, email/password, and SSO using OpenID Connect (OIDC).
Regardless of the authentication method, Keebo support must first be provided with a list of email addresses that should be granted access to the Keebo portal.
To set up SSO, an administrator must initially sign in to Keebo using email/password authentication. Once the SSO connection is configured, any user with an email address matching the administrator's domain can log in using the identity provider (IdP).
This guide describes how to configure Keebo SSO using the following providers:
How Is SSO Set Up With Okta?
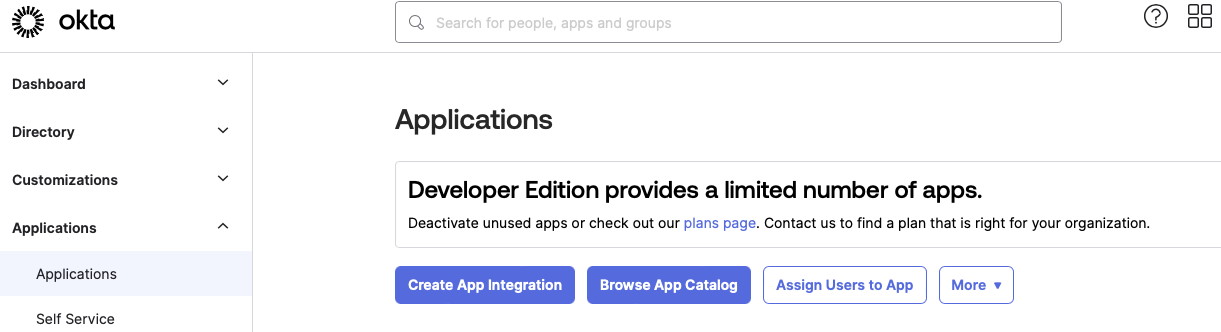
Step 1: Create an Okta App Integration
In the Okta portal under Applications, click the Create App Integration button.
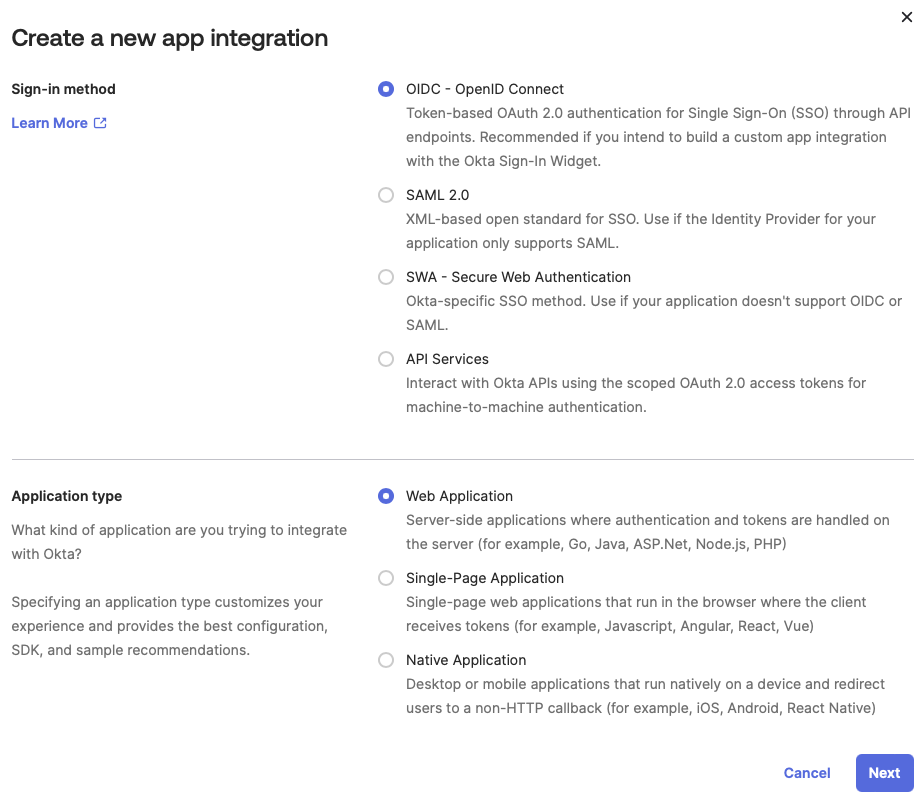
Select OIDC - OpenID Connect as the Sign-in method. Select Web Application as the Application type.
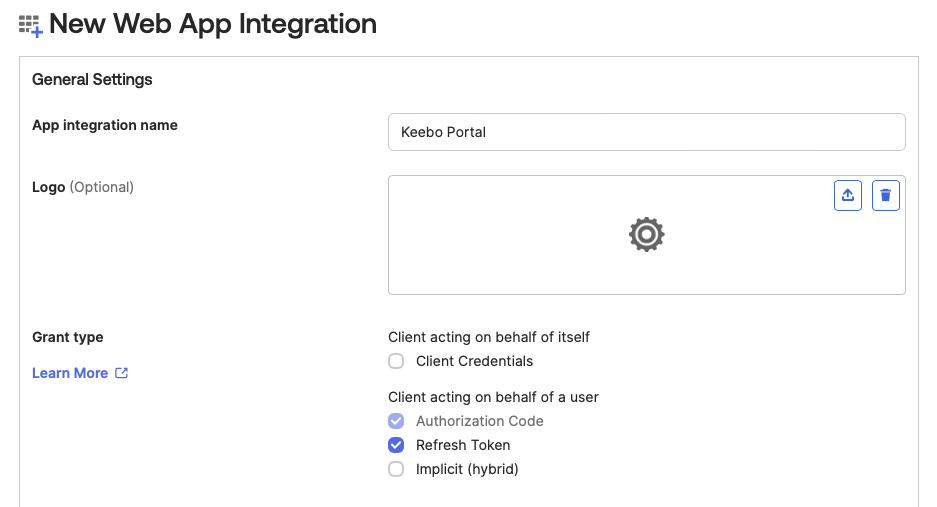
Step 2: Name the App and Configure Access
Give the app a name (e.g., Keebo Portal). For Grant Type, select only the Authorization Code and Refresh Token boxes. At the bottom of the page under Assignments, select the appropriate option for the organization. Leave all other settings at their defaults and click Save.
Step 3: Copy Credentials Into Keebo
In the Keebo portal, navigate to Settings > General > SSO and enter:
- Client ID — Copied from the Okta app
- Client Secret — Copied from the Okta app
Step 4: Set the Issuer URL
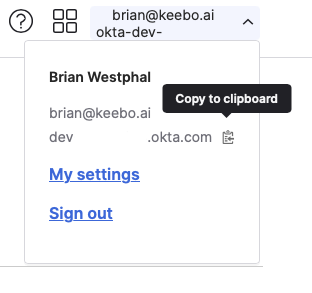
To find the URL, open the account menu in the top right corner of the Okta app, then hover over the server name beneath the username/email address. Copy the Okta server name and prepend https://.
Step 5: Enable SSO and Set Redirect URIs
Toggle the Enable SSO switch and click Save. After saving, Keebo displays a Callback URL. Paste this into the Sign-in redirect URI and Sign-out redirect URI fields of the Okta app under General Settings > Edit. Leave all other sections blank and click Save.
How Is SSO Set Up With Azure (Entra ID)?
Step 1: Copy the Callback URL
In the Keebo portal, go to Settings > General > SSO and copy the Callback URL shown on the page.
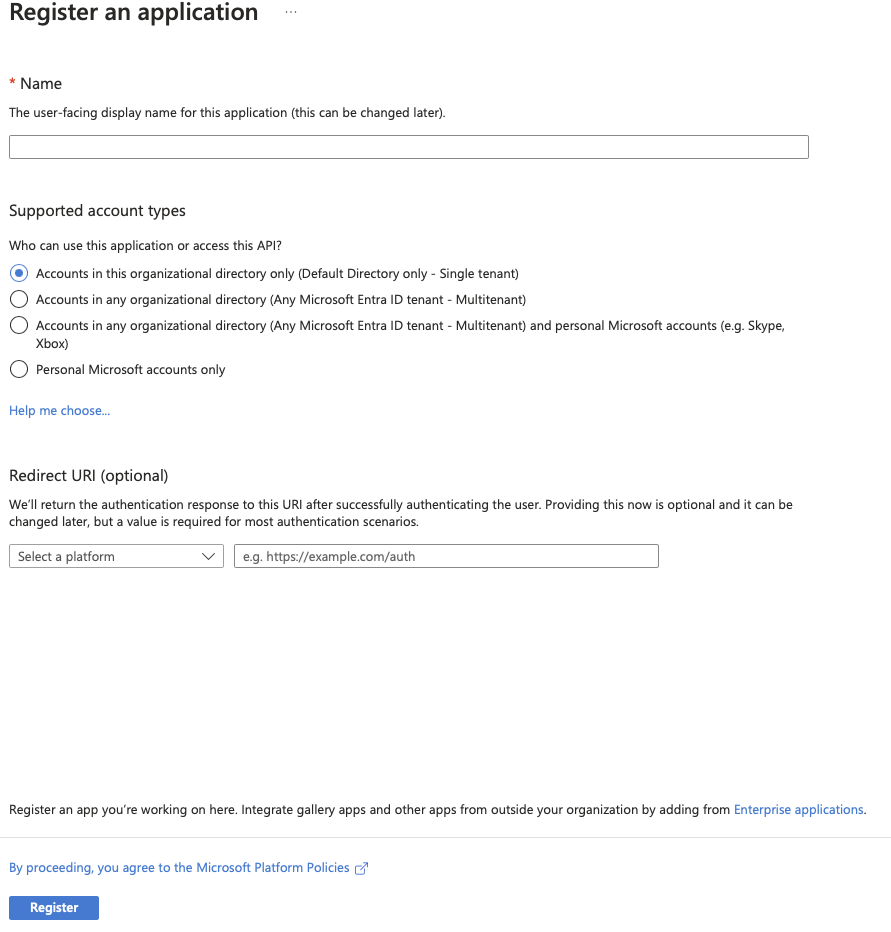
Step 2: Create an App Registration in Azure
In the Azure portal, go to Entra ID > App registrations > New registration. Name the app (e.g., Keebo Portal), select which account types should have access via SSO, and set the redirect URI:
- Platform: Web
- URI:
https://keebo-portal.firebaseapp.com/__/auth/handler
Click Register to complete app registration.
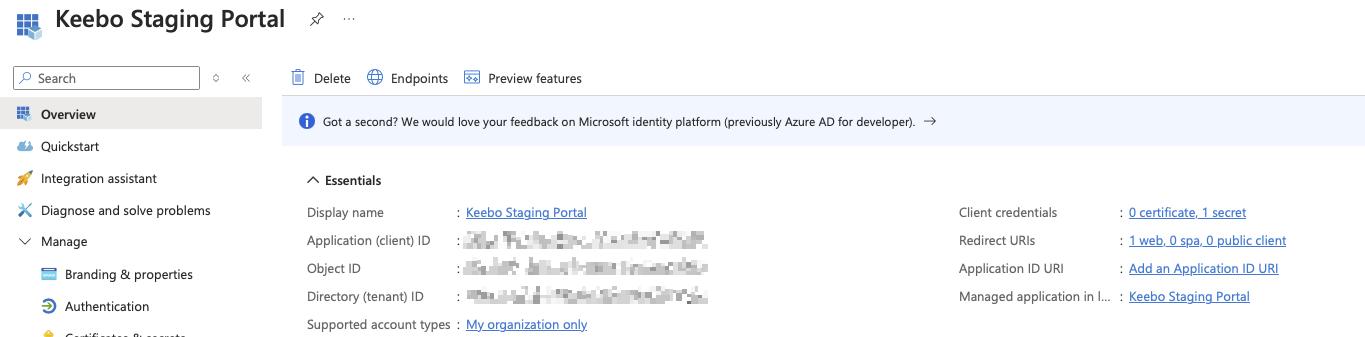
Step 3: Copy the Application (Client) ID
After registration, copy the Application (client) ID from the overview page.
Step 4: Create a Client Secret
In the App Registration view, go to Certificates & secrets > Client secrets, click New client secret, and copy the secret value immediately (it is not shown again).
Step 5: Configure Values in Keebo
Return to the SSO tab in the Keebo portal and enter:
- Client ID — Azure Application (client) ID
- Client Secret — Value from the newly created secret
- Issuer URL — Go to the App registrations page in Entra ID, click Endpoints, and copy the OpenID Connect metadata document endpoint URL. Remove
/.well-known/openid-configurationfrom the end before pasting into the Keebo portal.
Toggle the Enable SSO switch and click Save.
How Is SSO Set Up With JumpCloud?
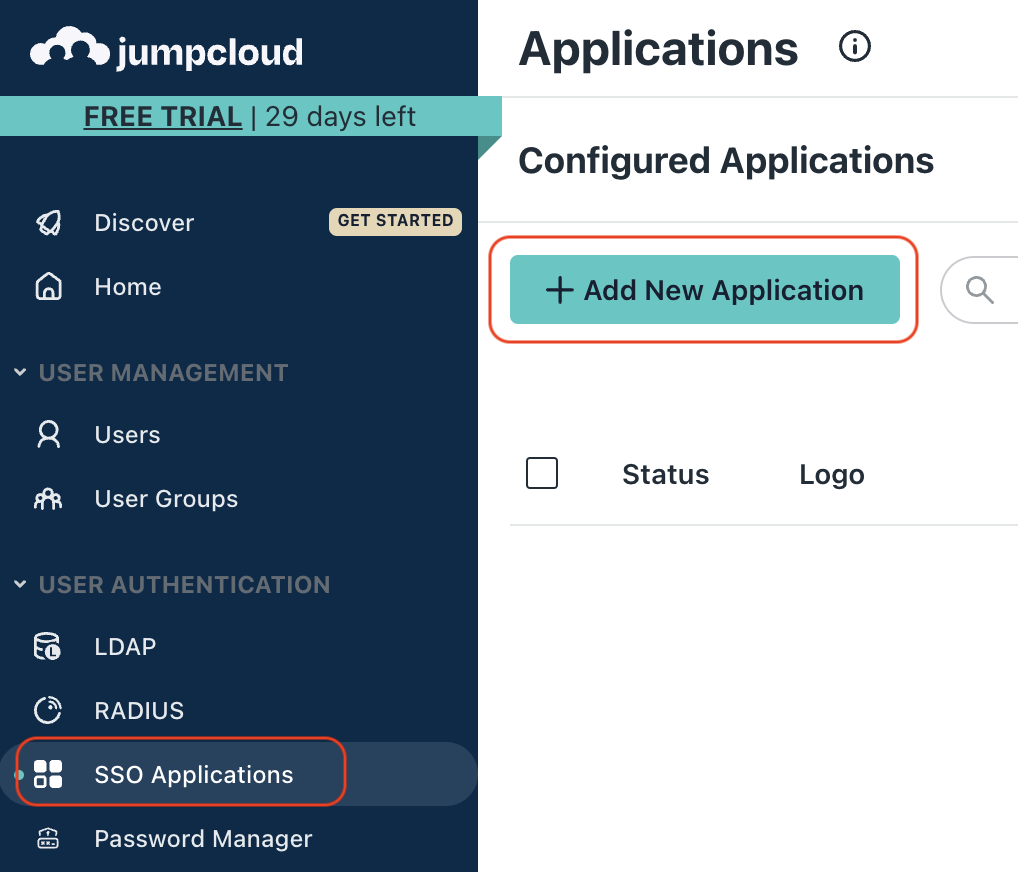
Step 1: Create a JumpCloud SSO Application
In the JumpCloud portal, go to User Authentication > SSO Applications > Add New Application.
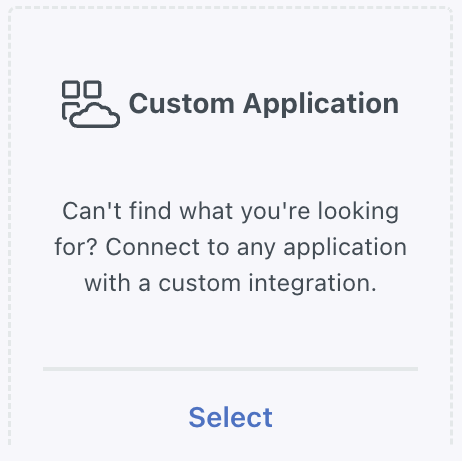
Step 2: Select Custom Application
Choose Custom Application, click Next, and select Configure SSO with OIDC.
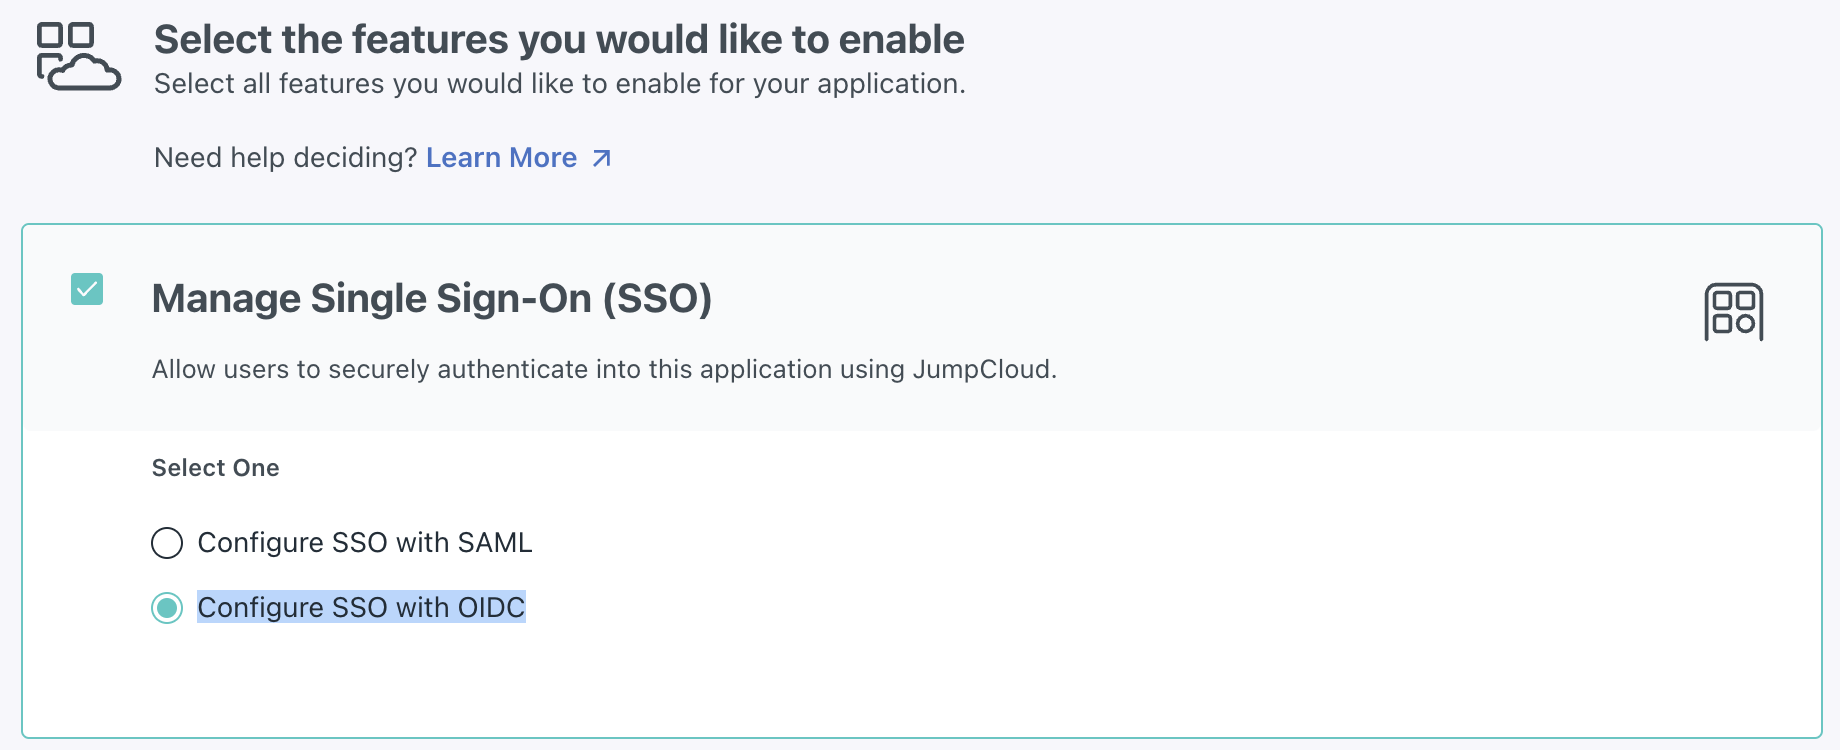
Step 3: Select Features
From the Features menu, check the Manage Single Sign-On option and select the Configure SSO with OIDC sub-option. Click Next.
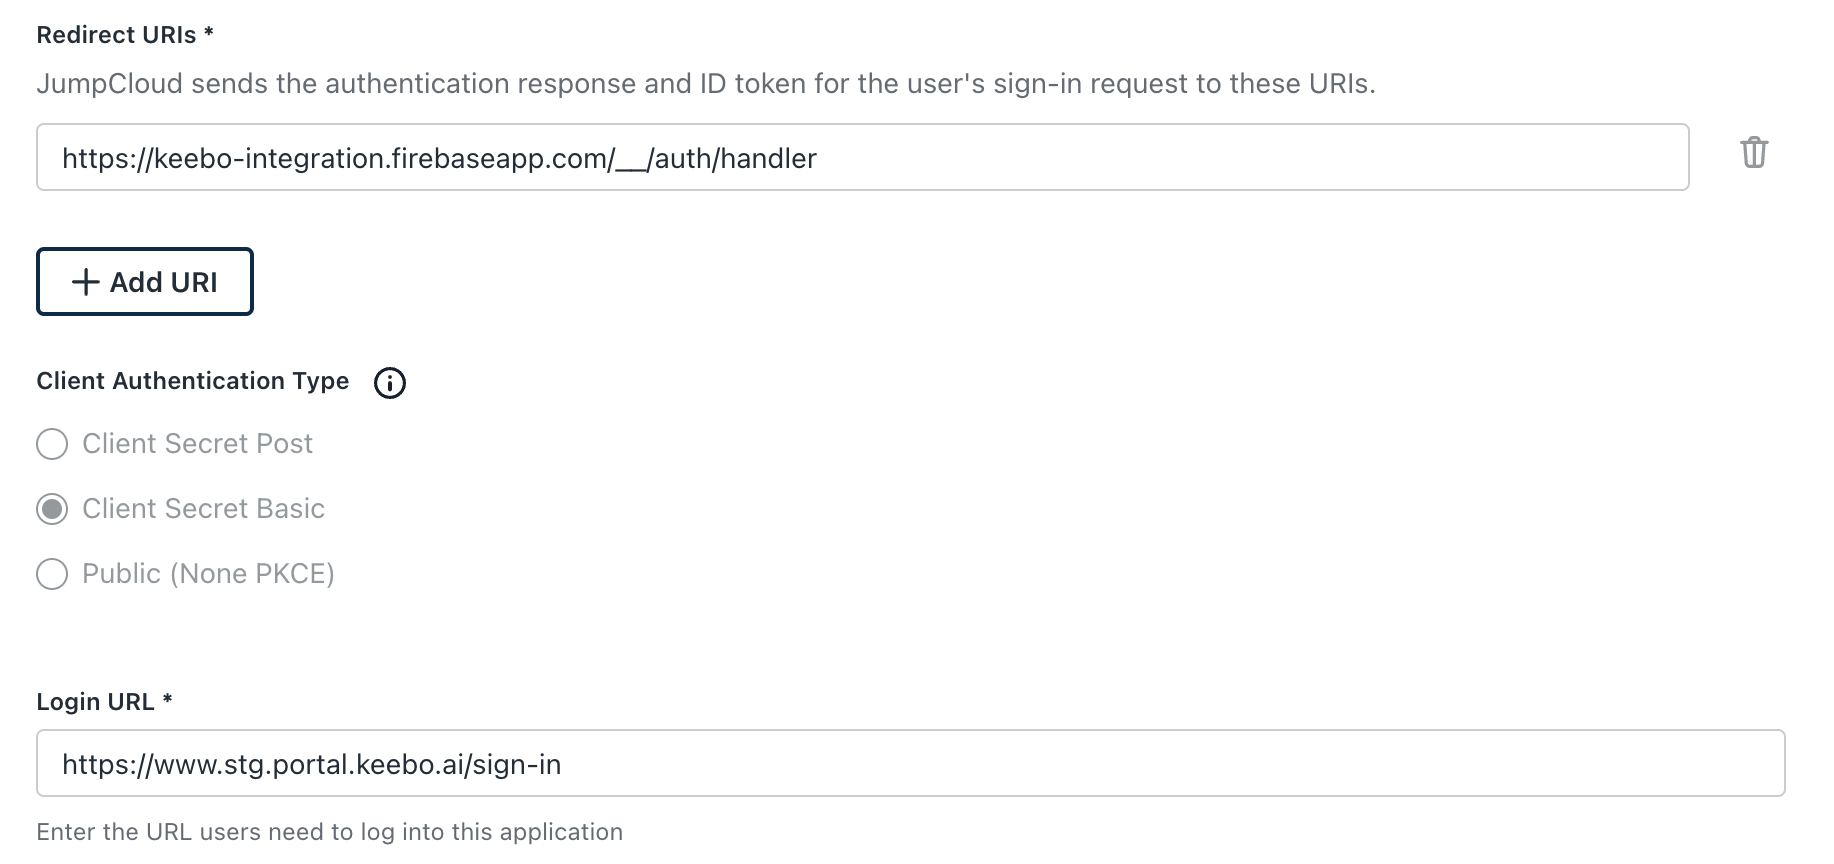
Step 4: Set Application Details
In the Display Label field, type "Keebo" and click Next, then click Configure Application. In the SSO tab, configure the following:
- Display Label — Keebo
- Redirect URIs —
https://keebo-portal.firebaseapp.com/__/auth/handler - Client Authentication Type — Client Secret Basic
- Login URL —
https://www.portal.keebo.ai/sign-in
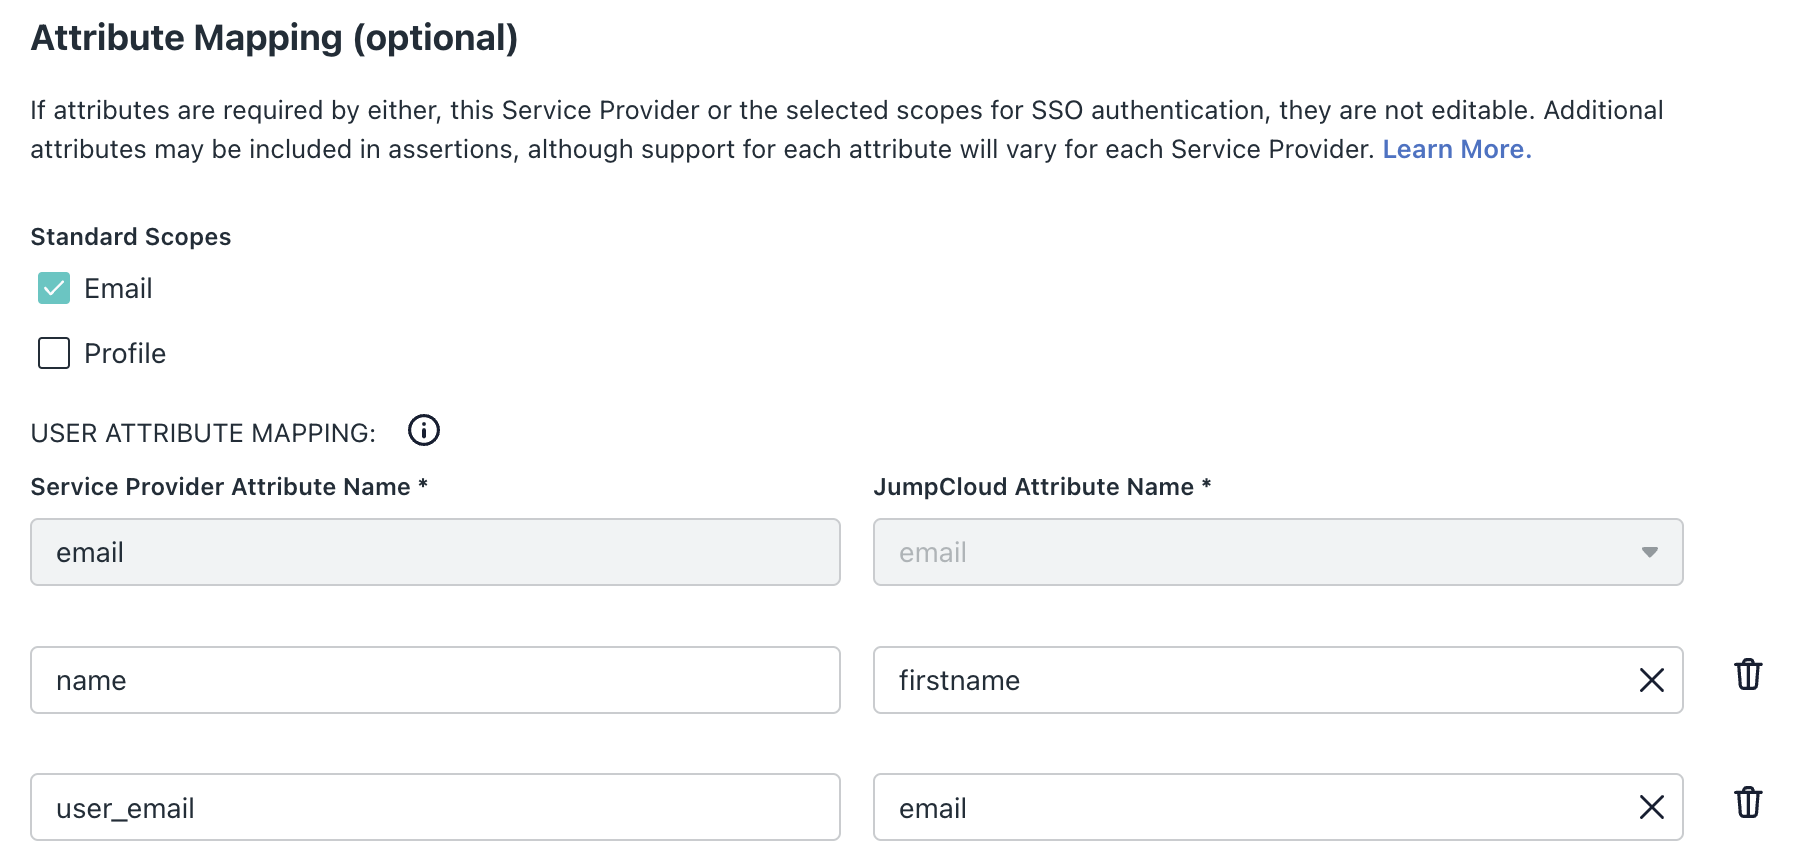
Step 5: Configure Attribute Mappings
Set the following mappings under Attribute Mappings:
| Service Provider Attribute | JumpCloud Attribute |
|---|---|
user_email | email |
name | fullname or firstname |

Verify the following mapping is present in the Constant Attributes section.
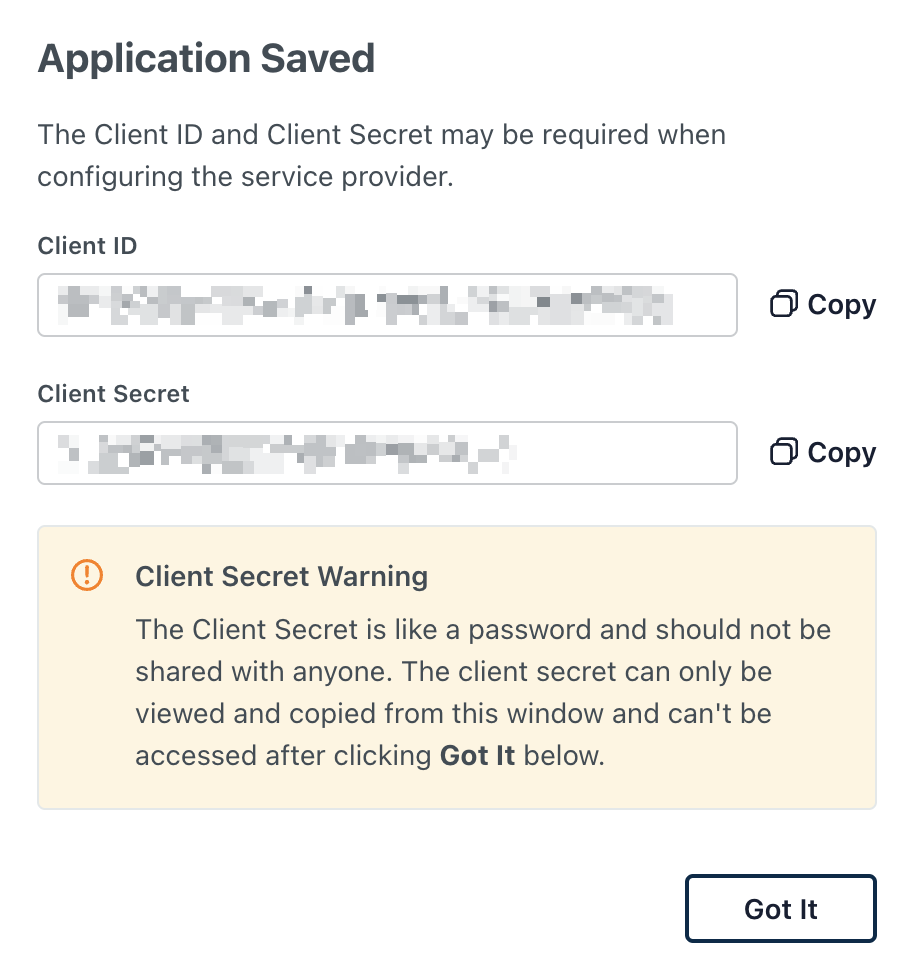
Step 6: Activate and Copy Credentials
Click Activate, then copy the Client ID and Client Secret values before closing the page.
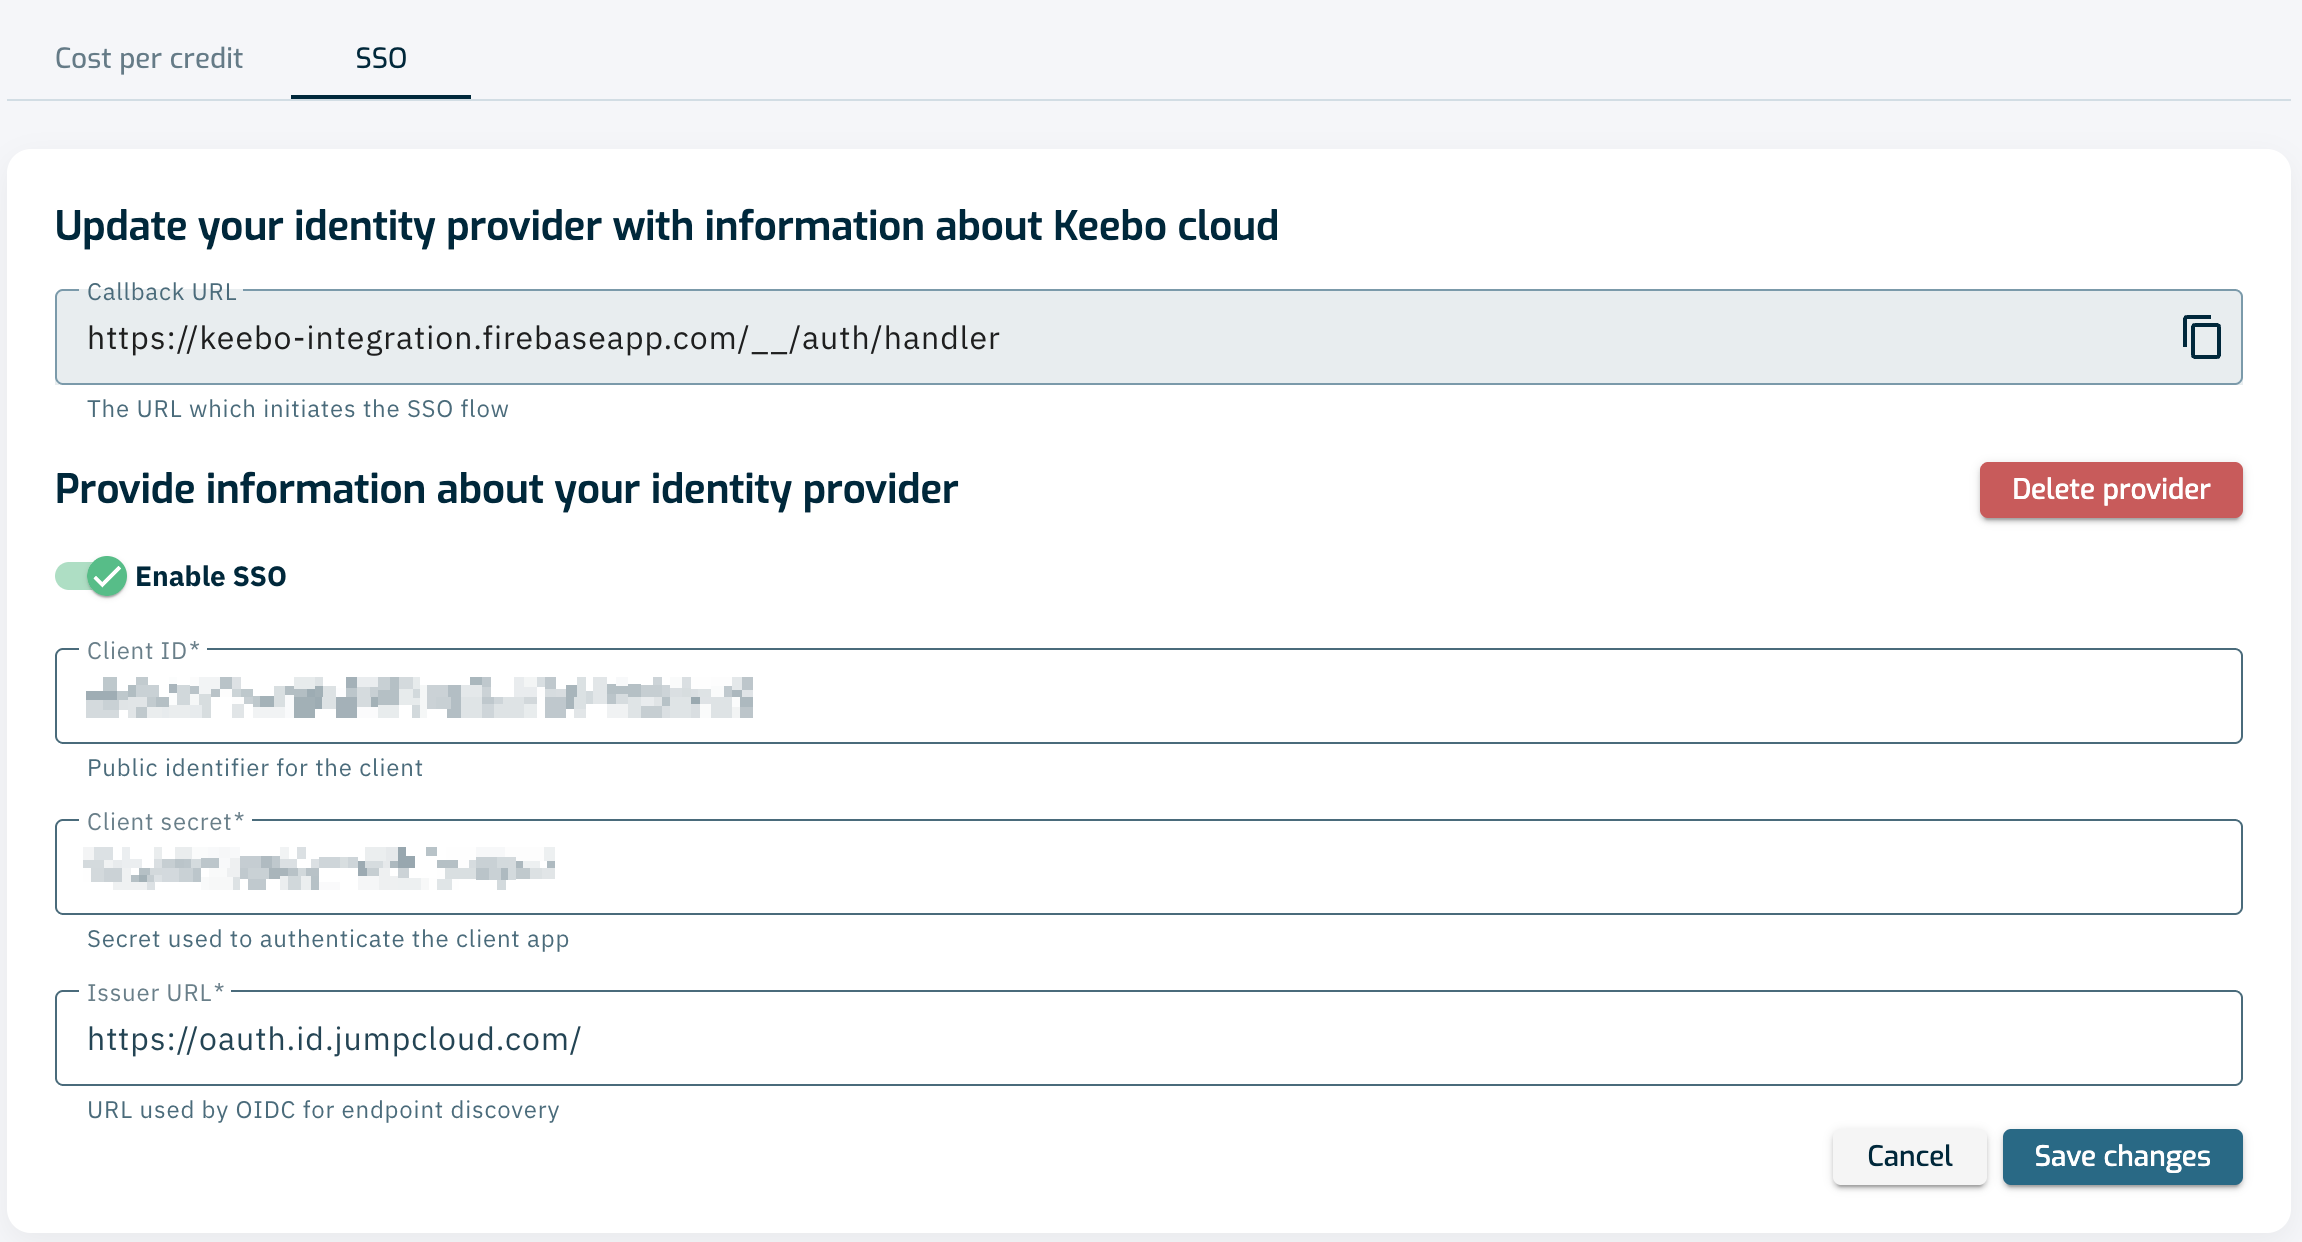
Step 7: Enter Credentials in Keebo
Go to Settings > General > SSO in Keebo and enter:
- Client ID — Copied from JumpCloud
- Client Secret — Copied from JumpCloud
- Issuer URL —
https://oauth.id.jumpcloud.com/
Click Save Changes.
Under the Users section, add each user and assign a role. Email addresses must match what is defined in JumpCloud.
How Do Users Sign In With SSO?
Once SSO is configured, users can access the Keebo portal using the identity provider.
- Sign in with SSO — Click "Sign in with SSO" on the Keebo login page, enter an email address, and complete login through the IdP.
- Admin fallback access — The original admin user can continue to sign in using either email/password or SSO.
- Optional password login — Other users can sign in with a password if they choose to set one.
- Browser cookie requirement — SSO sign-in requires accepting cookies from the Keebo portal on the first visit.
How Is the Public API Accessed?
Keebo exposes a REST API for programmatic interaction with Warehouse Optimization and Smart Query Routing products.
- Warehouse Optimization API Documentation — Navigate to Swagger Editor and paste the contents of
openapi-kwo.yaml. - Smart Query Routing API Documentation — Navigate to Swagger Editor and paste the contents of
openapi-kqr.yaml.
How Is API Authentication Configured?
Before using the Keebo APIs, authenticate with the OAuth2 service to obtain an access token.
Run the following script:
# Set the client credentials provided by Keebo
export CLIENT_ID="your_client_id"
export CLIENT_SECRET="your_client_secret"

# Store the access token in an environment variable
export ACCESS_TOKEN=$(curl -s -X POST https://auth.keebo.ai/oauth/token \
  -H "Content-Type: application/json" \
  -d '{
    "client_id": "'$CLIENT_ID'",
    "client_secret": "'$CLIENT_SECRET'",
    "audience": "https://kqr.api.keebo.ai/v1",
    "grant_type": "client_credentials"
  }' | jq -r '.access_token')

# Verify the token is set
echo $ACCESS_TOKEN
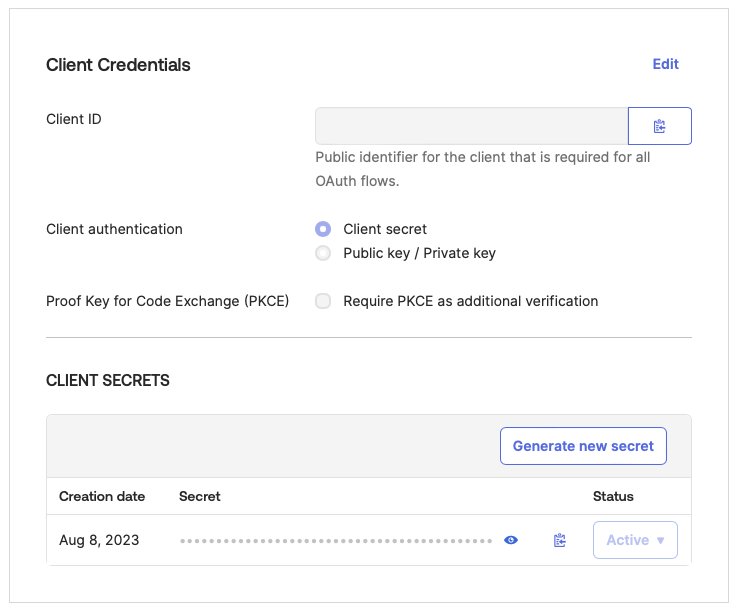
- CLIENT_ID — Found on the General Settings page in the Keebo portal under "Public API." Copy the organization's client ID into the script.
- CLIENT_SECRET — Found on the General Settings page in the Keebo portal under "Public API." Copy the organization's client secret into the script.
- ACCESS_TOKEN — The output of the script. Save this token and use it in all calls to the Keebo APIs.